Project Info - The Ghost Grinder
The Ghost Grinder is a procedurally generated tower defense game. Extensive scripting has led to a tile by tile map generator that can create a variety of different levels for the player to fight through.
The programming for the level builder, pathfinding, and UI was done by me. The scripting for the enemies and towers, as well as the models/textures for the towers, walls, and tiles, were done by colleagues. The foliage and rocks are Unreal Marketplace assets.
Scripting
Main Takeaways
- Having extensive debugging for complex systems such as this is vital.
- Some complex systems overlap in ways that prevent them from being debugged until they are completed.
- Having lots of actors even with just meshes is costly for performance; Mesh components should be preferred wherever possible.
Planning the Level Builder
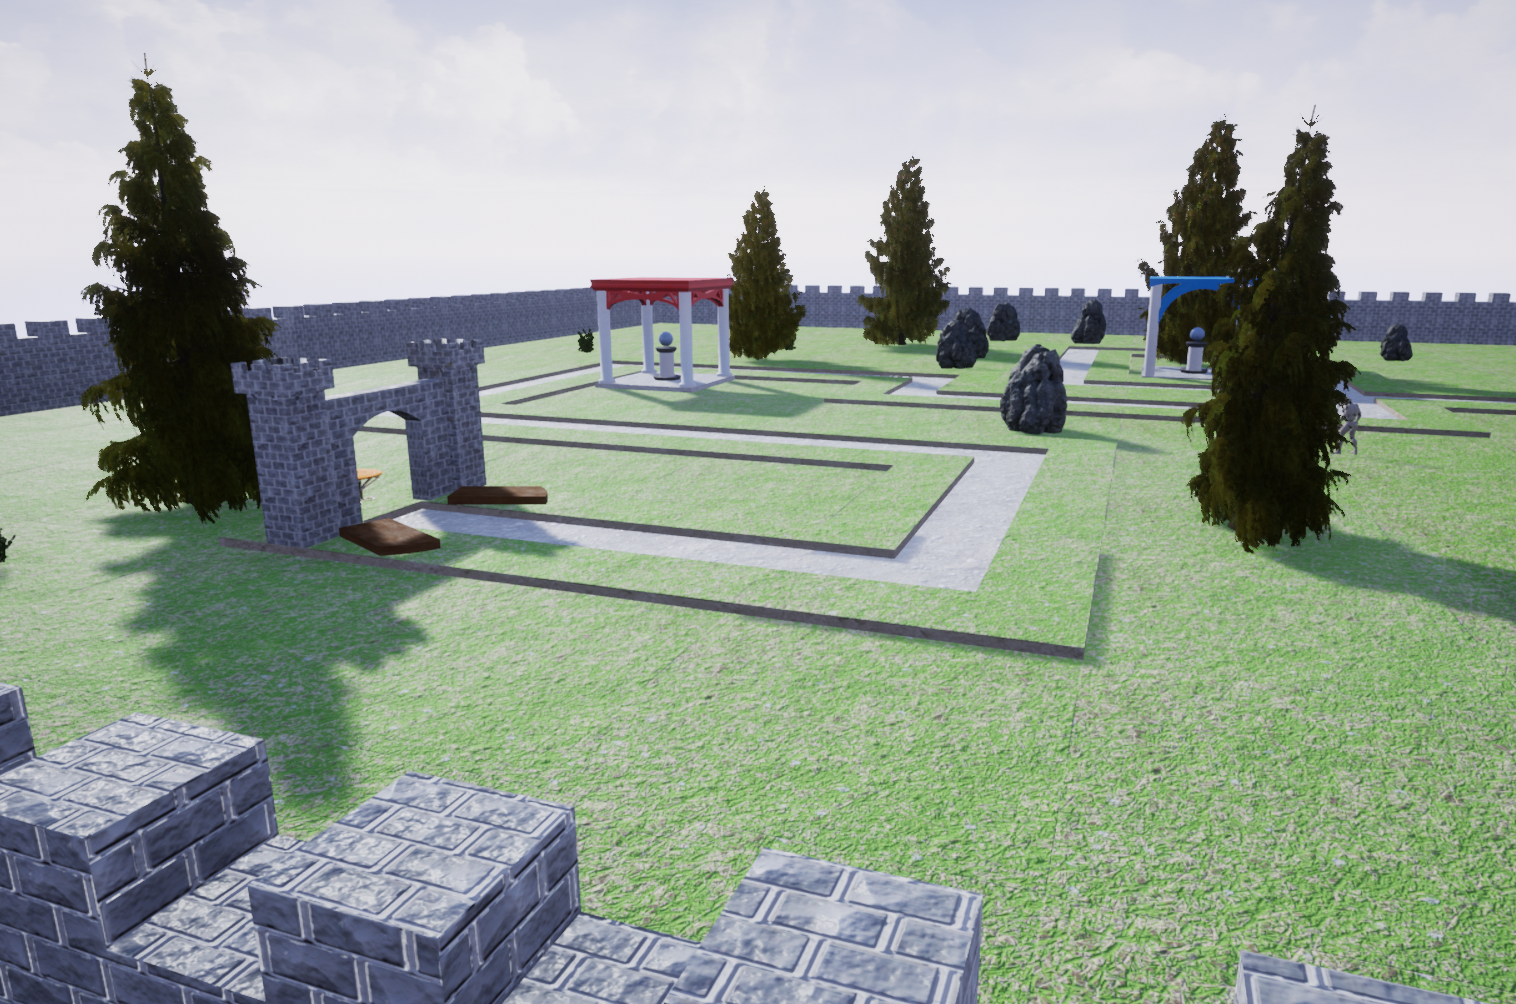
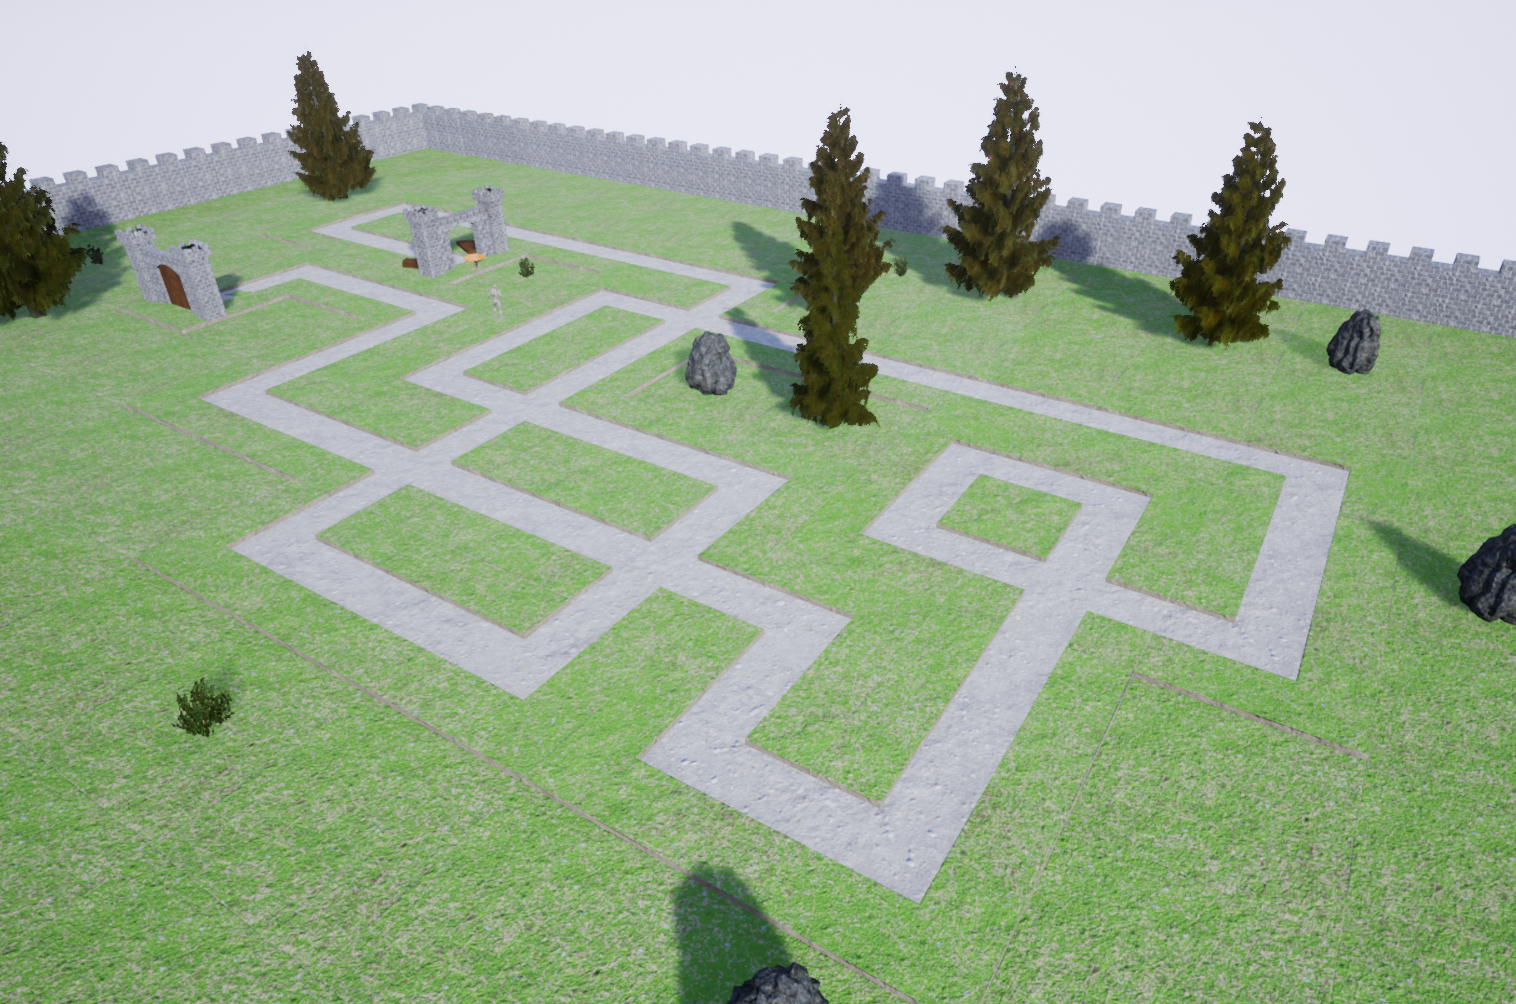
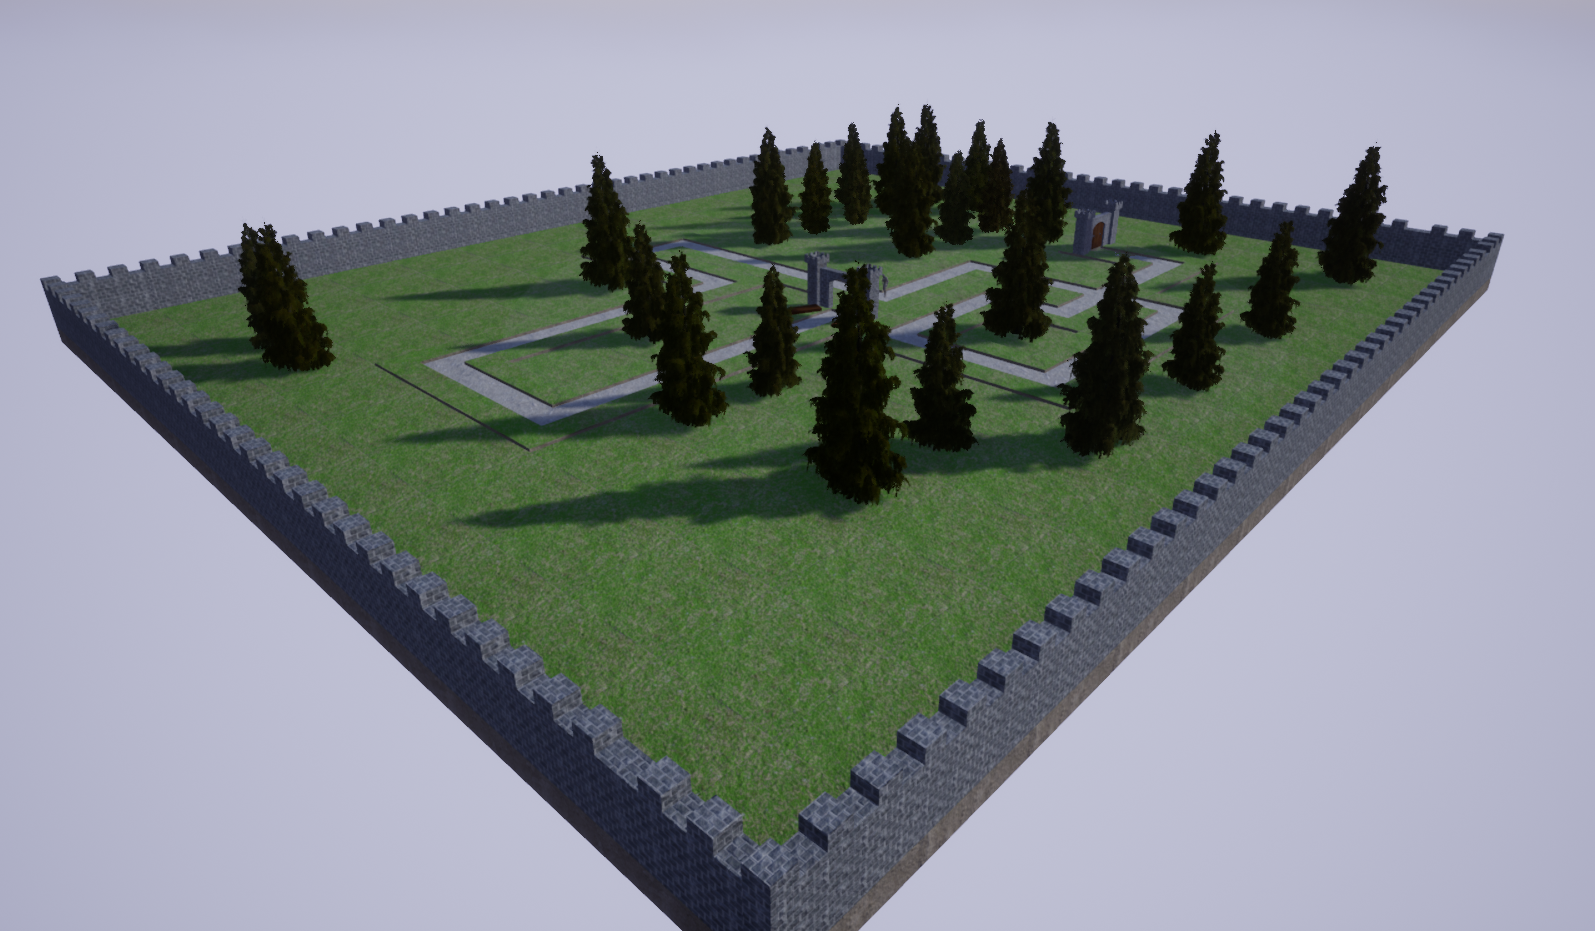
My goal for the Level Builder was for it to be able to draw out a path which could cross over itself and create intersections, resulting in many strange and interesting shapes levels could be drawn in. Levels are made up of square tiles which are placed one by one until the level's end. At first I set out to create premade "template" pieces that could be put together by the Builder like a jigsaw puzzle. However, I wanted levels to have a more irregular appearance and believed that this was worth the technical challenge.
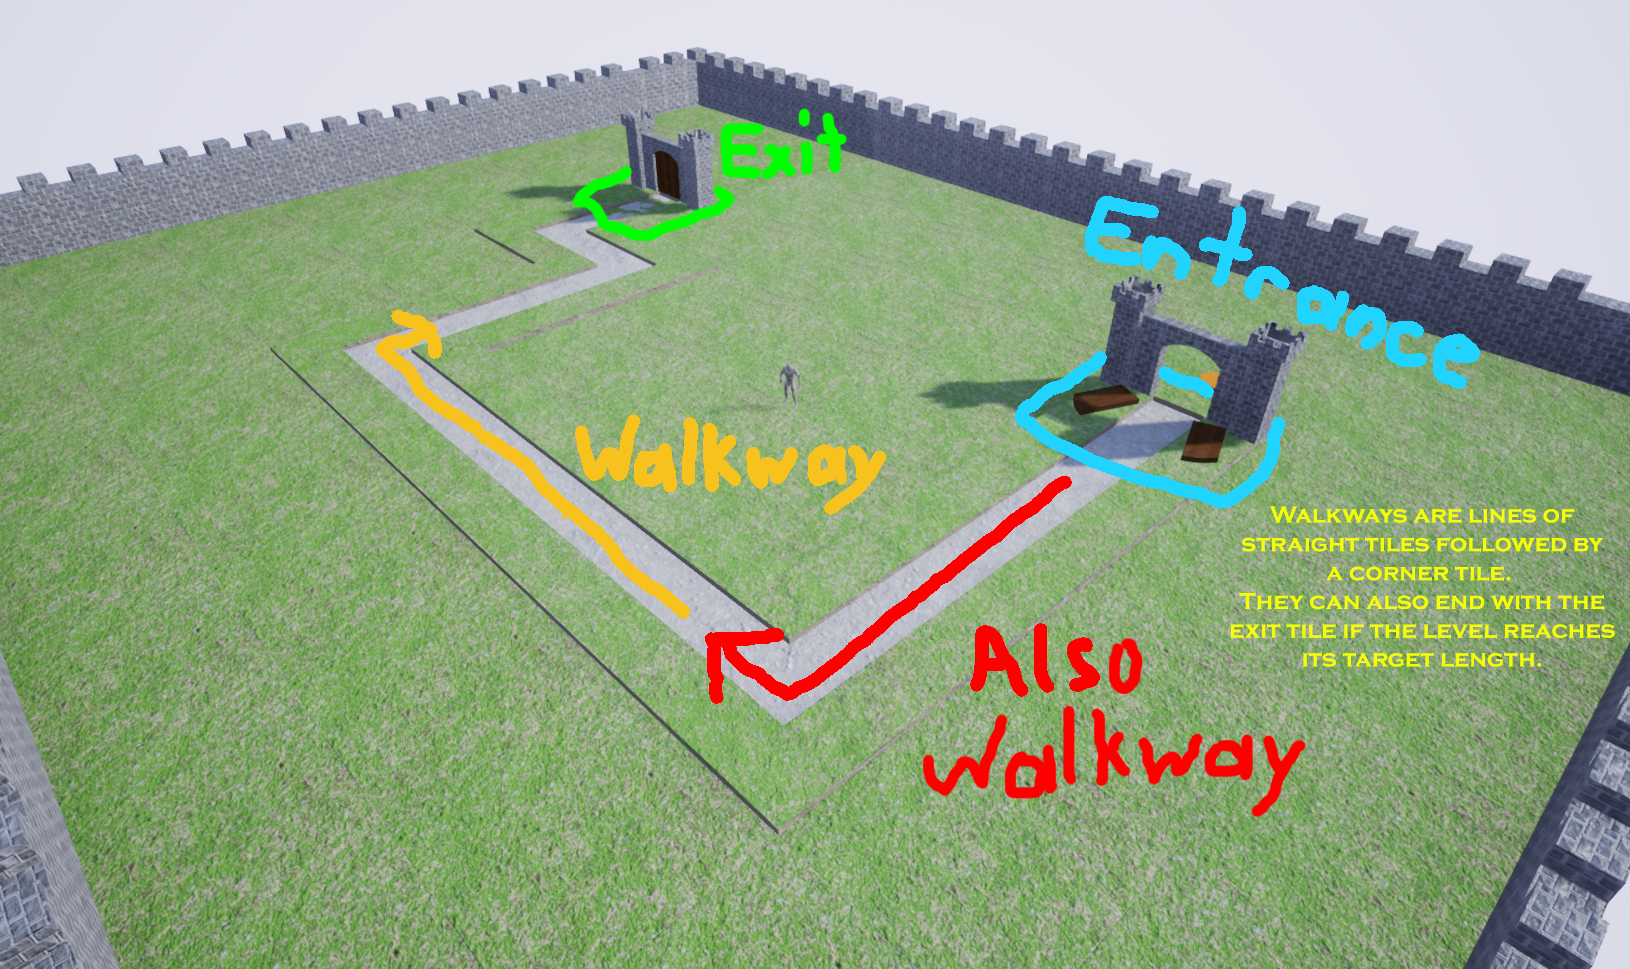
For executing this, my idea was to have the Builder construct the level in Walkways, which would be made up of a random amount of straight tiles followed by a corner tile that turns 90 degrees left or right. The Builder starts by placing an entrance tile for enemies to spawn from. It then continuously builds Walkways until the level reaches its intended length, at which point the next tile to be placed is replaced with an exit tile.
I've parameterized the level's total length and also created a "Max Tiles Before Corner" parameter to decide how many straight tiles get placed before corners. From here it is child's play to have the Builder generate different "types" of levels to further vary the gameplay. We might lower the Level Length and raise the Max Tiles Before Corner to make a compact level with just two or three turns.We could do the opposite and generate a level that is long and winding.
Before I could begin actually programming this design, I needed models of the tiles to build the level out of. The tiles all had simple shapes that could be prototyped by extruding BSPs. If the size or shape of a BSP isn't to my liking, I can quickly edit them within Unreal and avoid the hassle of re-importing assets. Once I'm satisfied with the model, it can be converted to a static mesh that can be used in blueprints.
Making a properly scaled final 3D model from a BSP prototype is surprisingly simple; BSP dimensions are measured in centimeters just like shapes in Maya are. They even have a gridded texture by default, which makes it easy to see the size of irregular portions of the model. If I send the BSP dimensions as well as the dimensions of the extruded parts to a 3D modeler, they can have a copy of the shape ready to be refined and textured in mere moments. Because I've already tested the size/shape of the model using the BSP prototype, the need to go back and forth to my 3D modeler for adjustments is kept at a minimum.
Building Process
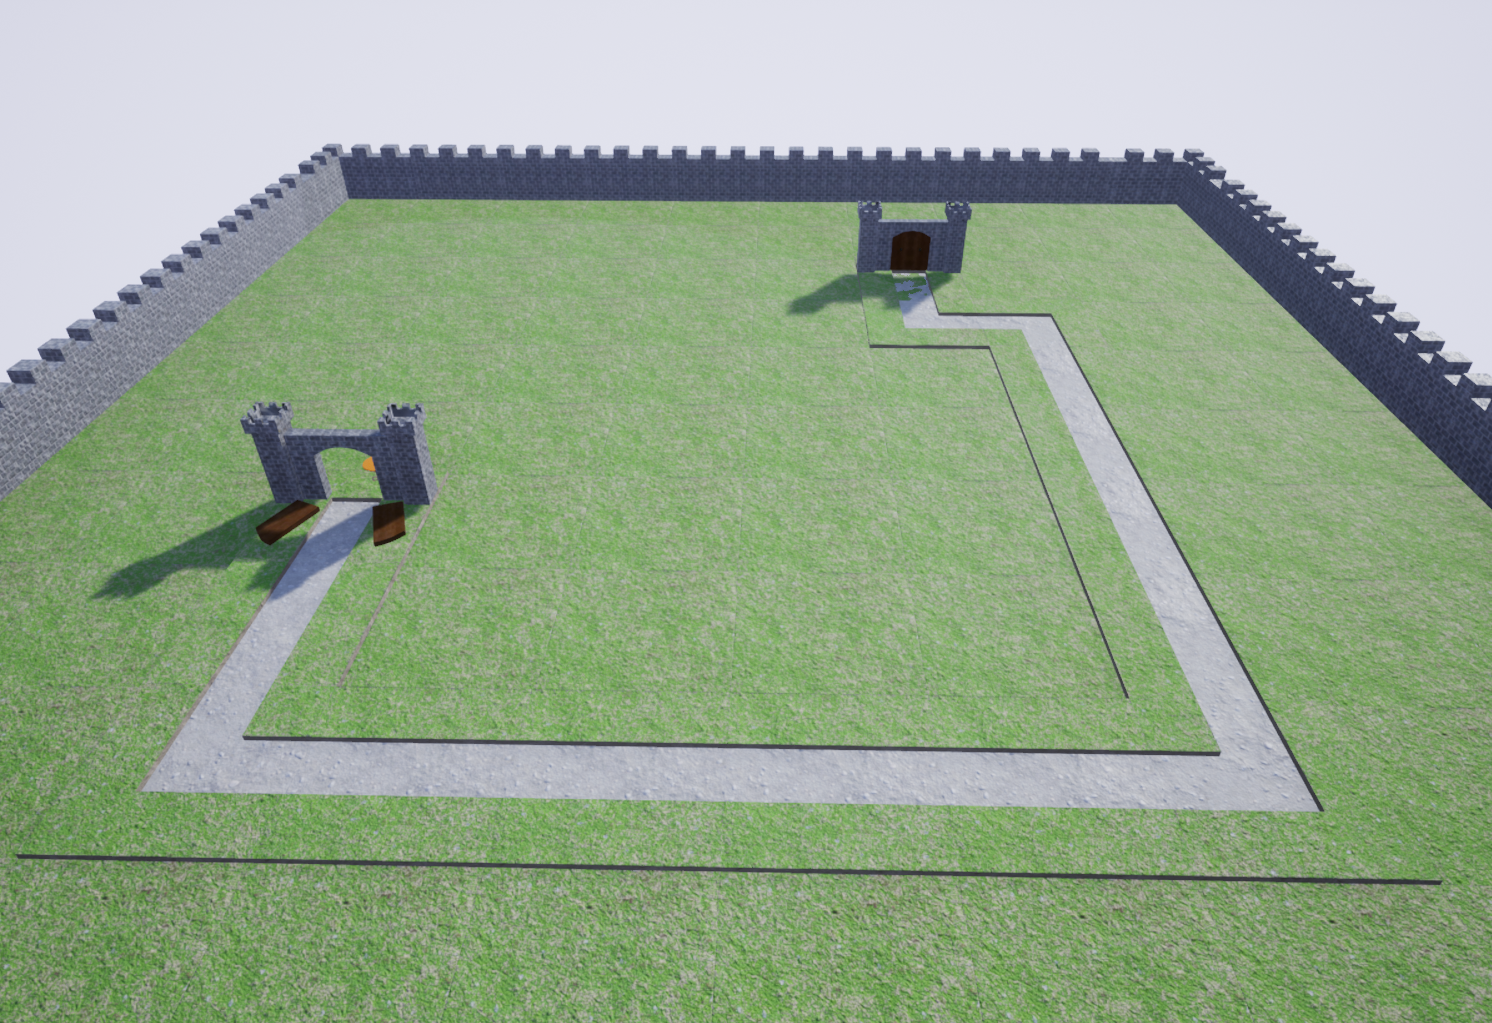
The Builder relies on extensive testing of the direction it chooses to build in order to place tiles correctly: It must know when to convert a straight tile into an intersection, when it can't make a Walkway a certain length due to previously placed tiles blocking it, and even when to "reject" a level and start over entirely.
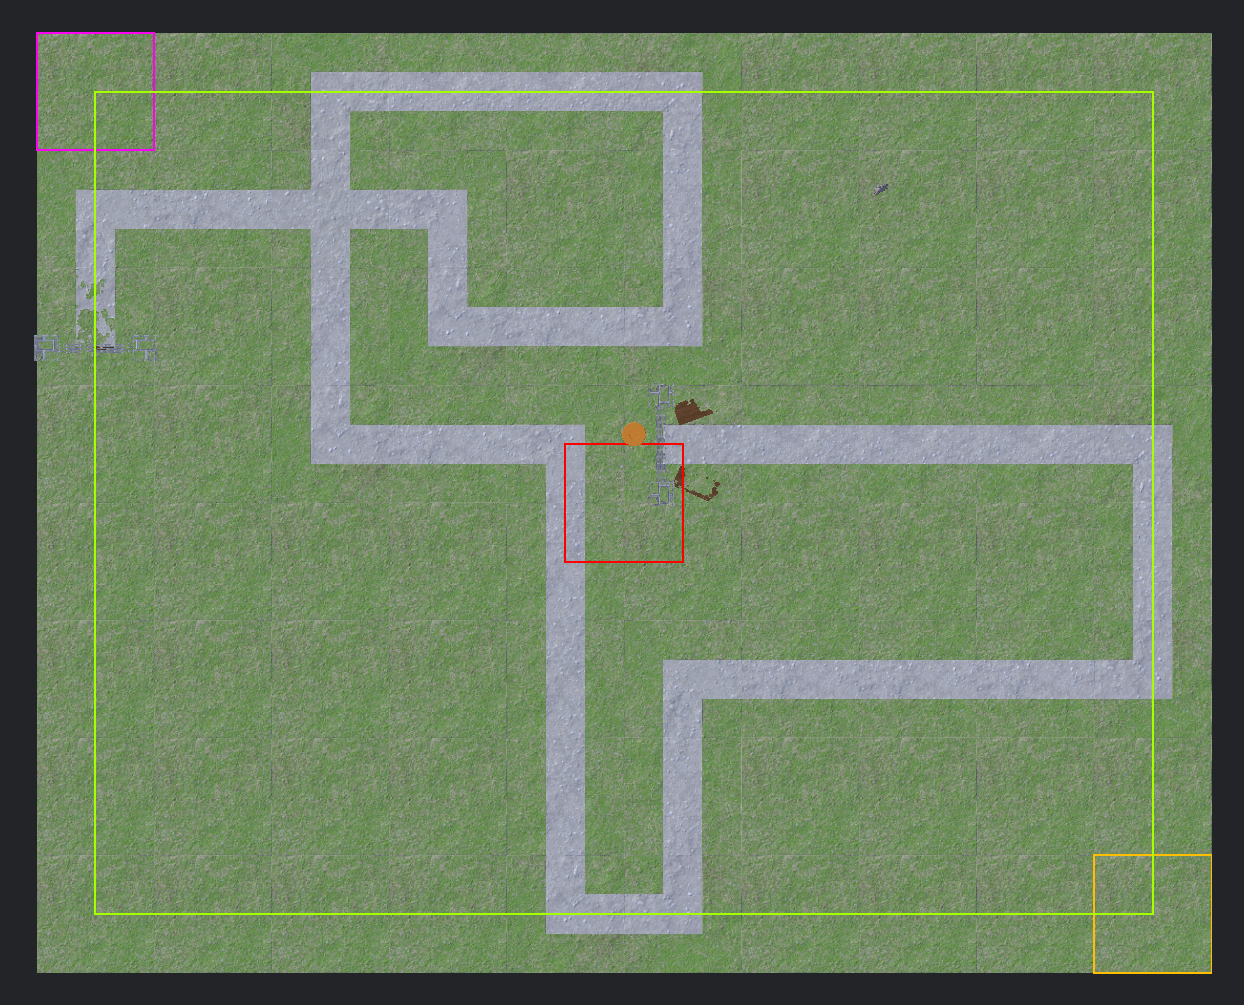
Obstructions are searched for by the Builder using raycasts (Unreal calls these "Line Traces" for some reason). If we set the raycast to be visible, we can see what the Builder is seeing. This heavily streamlines debugging, as we can not only see where the Builder is making a mistake, but why it is making a mistake.
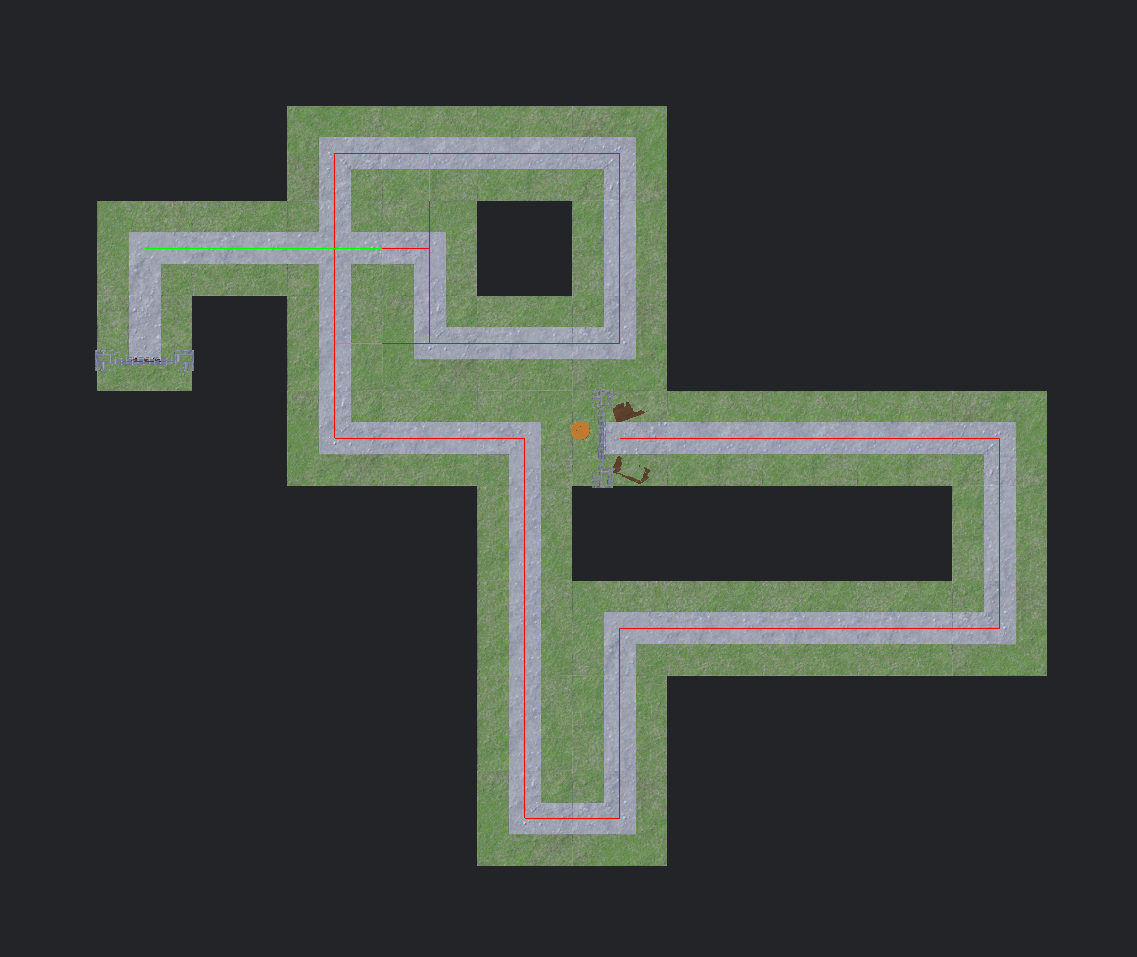
The red lines represent checks made to ensure there's enough room to build a Walkway of a certain length. A Walkway's length is a random value between 0 (which will cause only a corner to be placed) and the Max Tiles Before Corner parameter. It uses a raycast fired down the intended length of the Walkway to check for obstructing tiles (i.e. corners or start/end tiles) or straight tiles that must be converted to intersections. The ray outputs every tile struck, in the order they were hit, as an array, which the Builder iterates through to decide how to react to each tile.
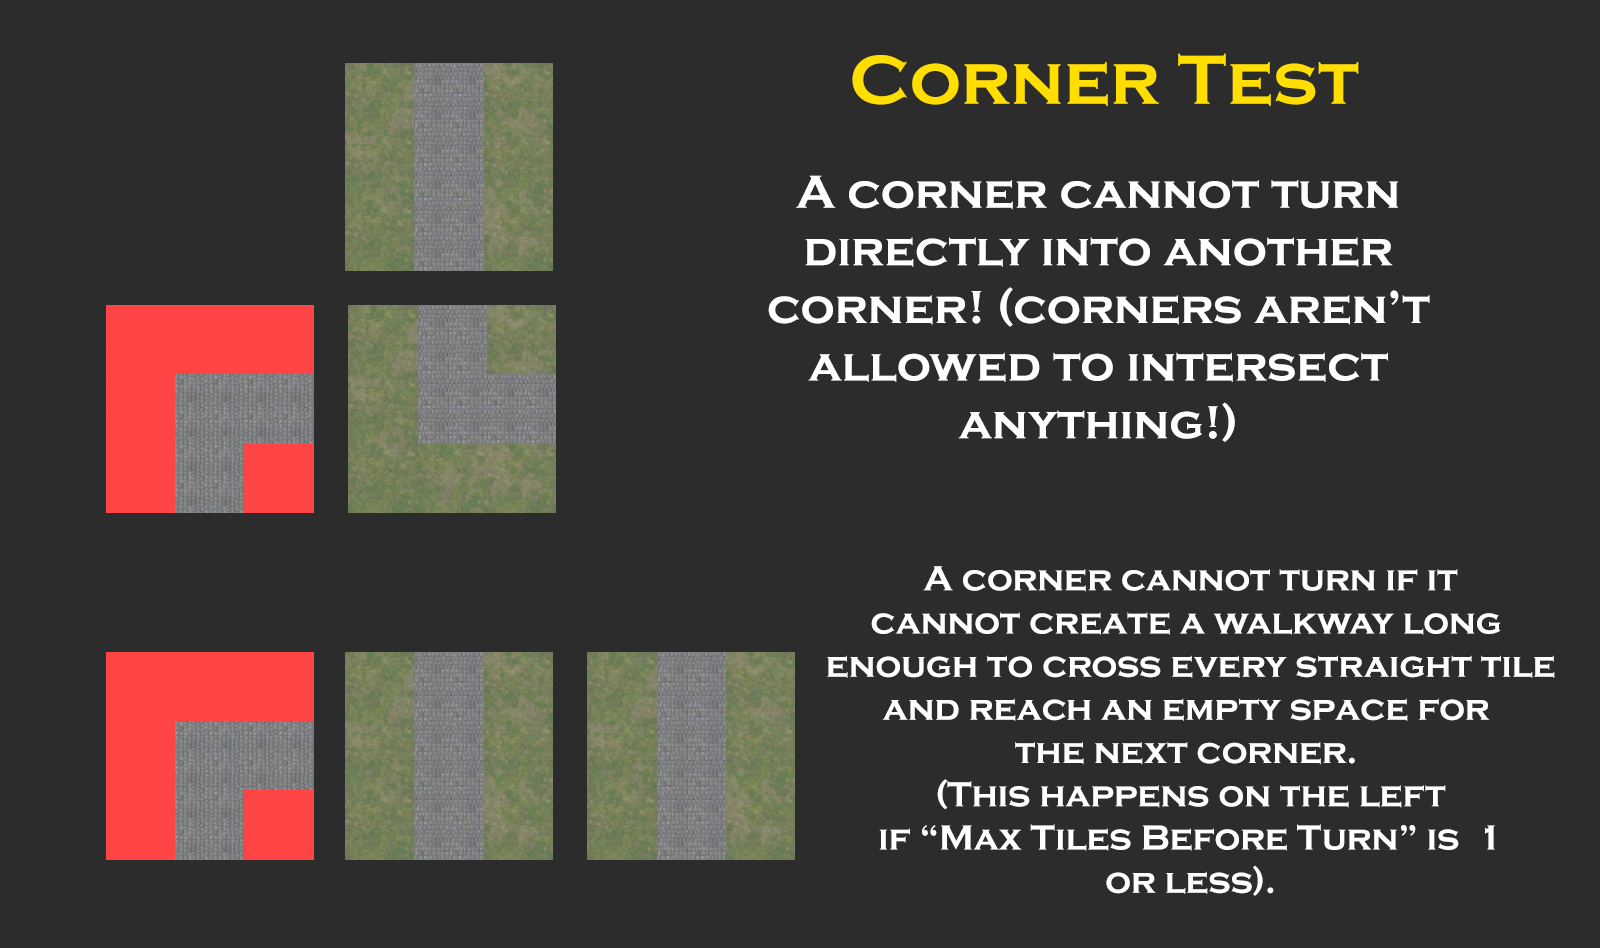
Any straight tiles found during this iteration are recorded in another array for later use. If either a corner or start/end tile is found, the Builder breaks out of the iteration and the length of the Walkway is adjusted. The Builder checks one tile backwards away from the obstruction until an empty space is found. An empty space must be found because a corner cannot intersect with any tile, even a straight tile.
Once the final Walkway length is decided, the actual tiles are placed, starting with the straight tiles. Before each straight tile is placed, the Builder checks through the array of intersecting straight tiles: If one is at the location the Builder is placing the straight tile in, the Builder instead places an intersection tile and destroys the obstructing straight tile it found. Straights are placed until the Walkway is one tile away from completion, at which point the Walkway is ended with a corner tile, or if the Builder is on its last tile for the level, an exit tile.
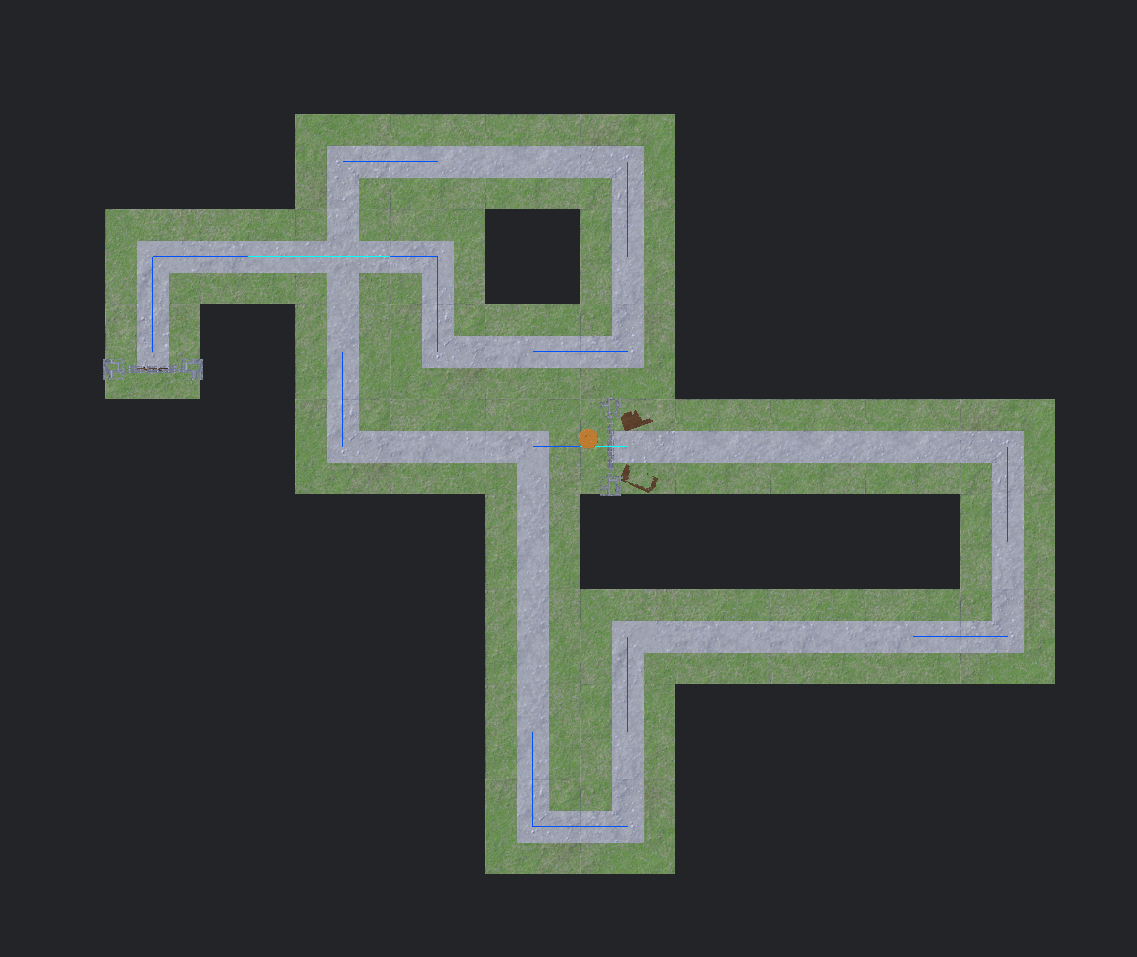
The blue lines represent checks made to decide which direction the Builder should turn in. These lines turn cyan when they hit a previously placed tile. This is done to check for cases in which a Walkway of any valid length would be blocked should a corner turn in a given direction.
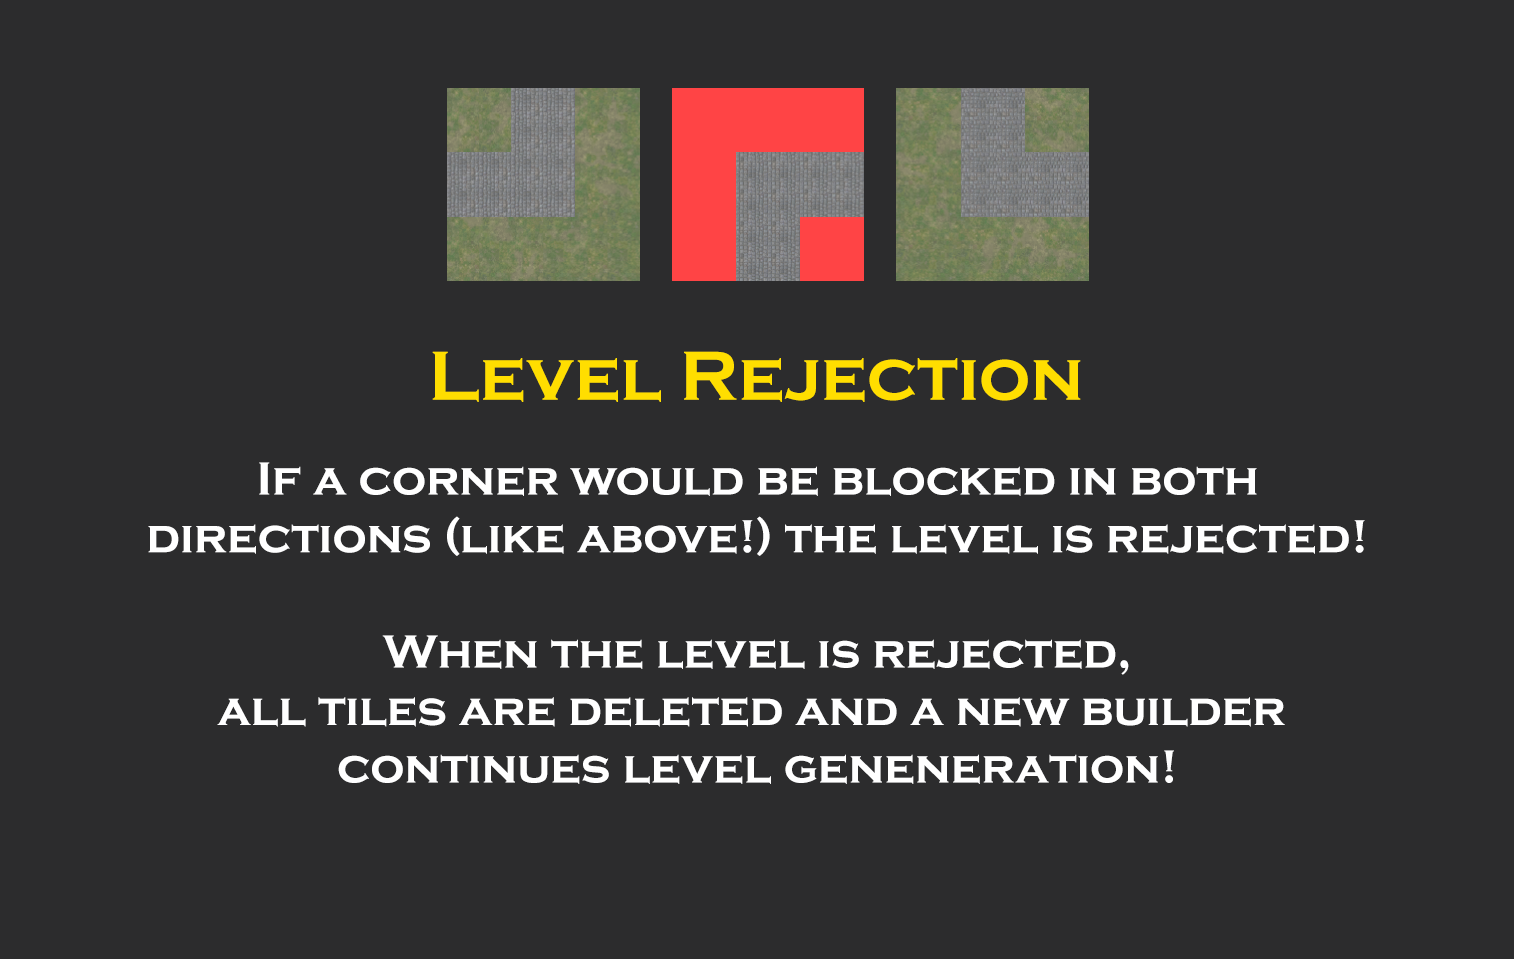
Before the check is made, the Builder chooses a random direction, left or right, to test. During the check, the Builder uses a series of raycasts to check each space in the chosen direction until an empty space is found. If an empty space exists, then the check succeeds and a Walkway may be built, as it will have a free space to put its corner tile (remember that these cannot intersect anything!). If no empty space is found before the check either travels the maximum distance a Walkway is allowed be or runs into a corner/start/end tile, then the check fails and must be repeated in the opposite direction. If the test fails a second time, this means that the level is impossible to continue and must be rejected; All of the tiles built are deleted and a new Builder restarts from the beginning. This new Builder continues from the old Builder's random seed.
In fixing the numerous bugs I came across in making the Builder, I realized that there was a flaw in the corner check and Walkway check. It was possible for the Builder to approve a corner but find it impossible to build a Walkway connected to it. This would happen because while the corner test would always test for a Walkway of the maximum allowed length, the Walkway itself would only search the length it was randomly generated to have, which could be and, often was, less than the maximum Walkway length. If the Walkway ran into an obstruction, it could only shorten the path to overcome it, meaning that if a Walkway is generated with a length that is less than the distance the corner check searched before finding an empty space, the Walkway would not be able to find a free tile for its corner.
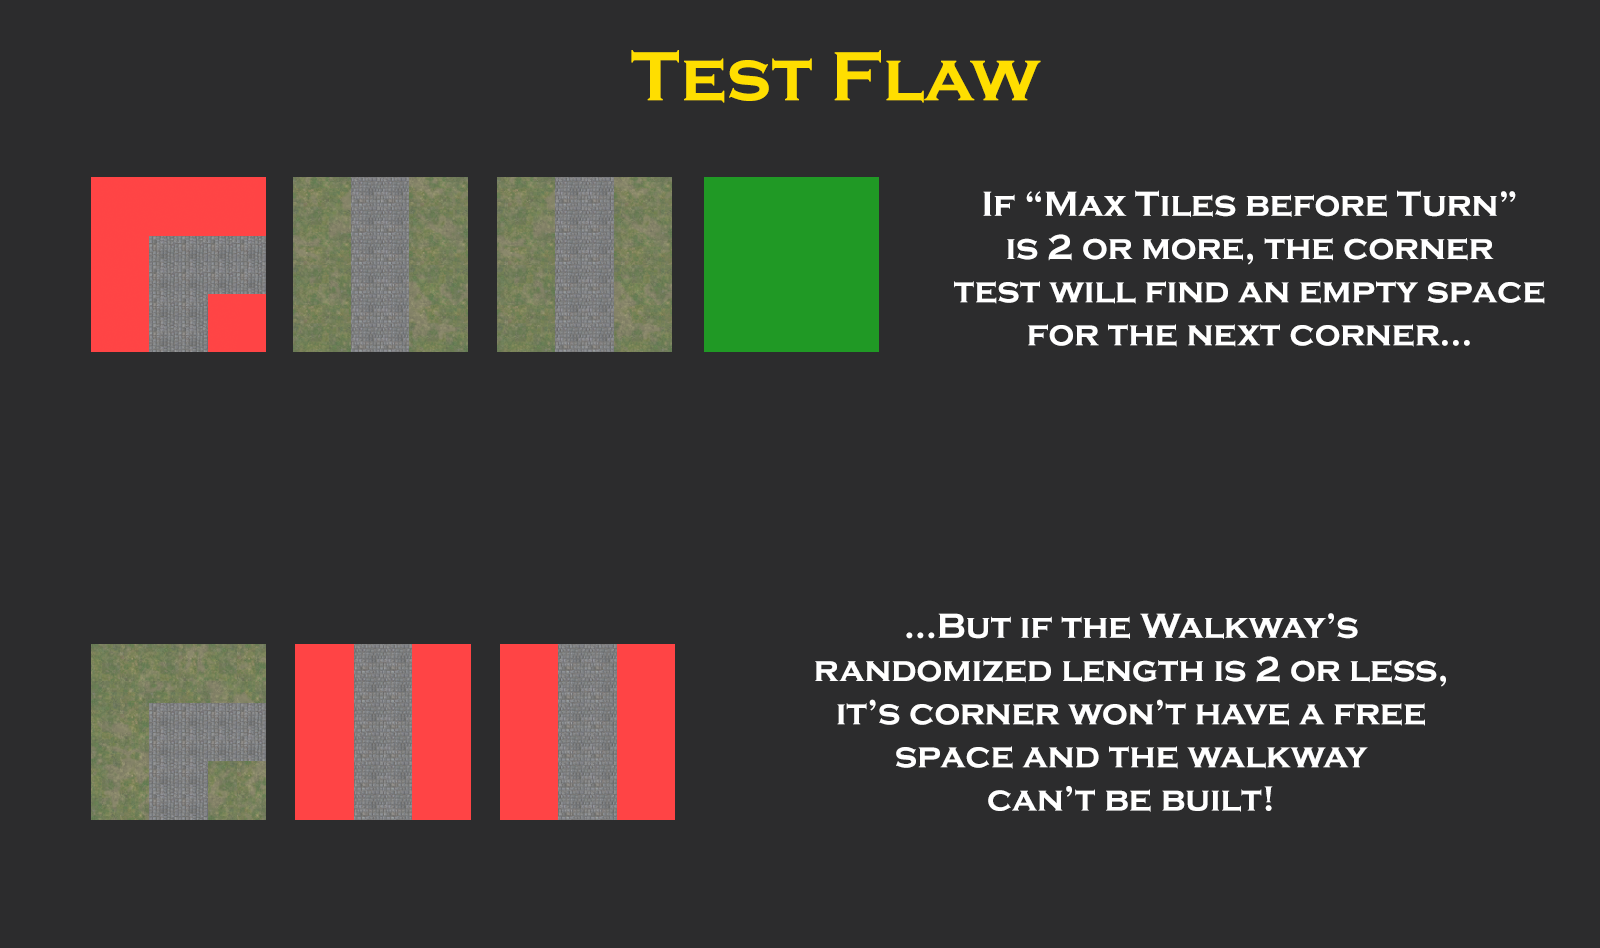
To fix this, I added an emergency tile length that is set by the corner check whenever it is successful. The emergency tile length is simply the distance the corner check had to travel before finding a free space for the next Walkway's corner. It would be impossible to build a Walkway less than the emergency length: If the Builder tries to generate a Walkway shorter than this, the Walkway's length is instead set to the emergency tile length.
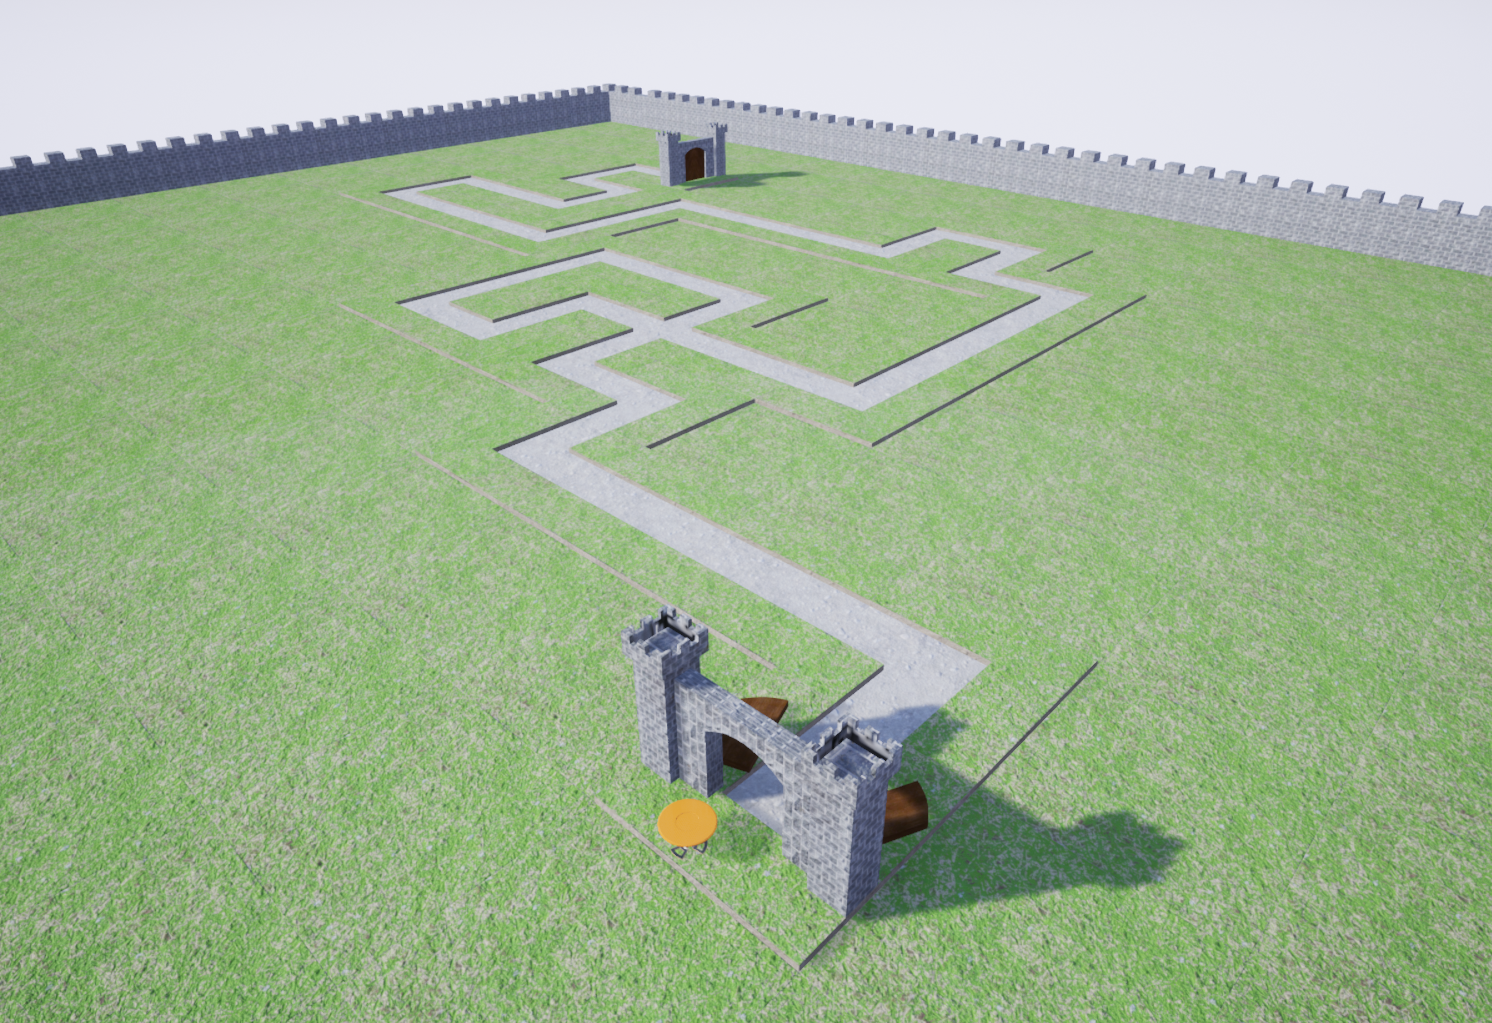
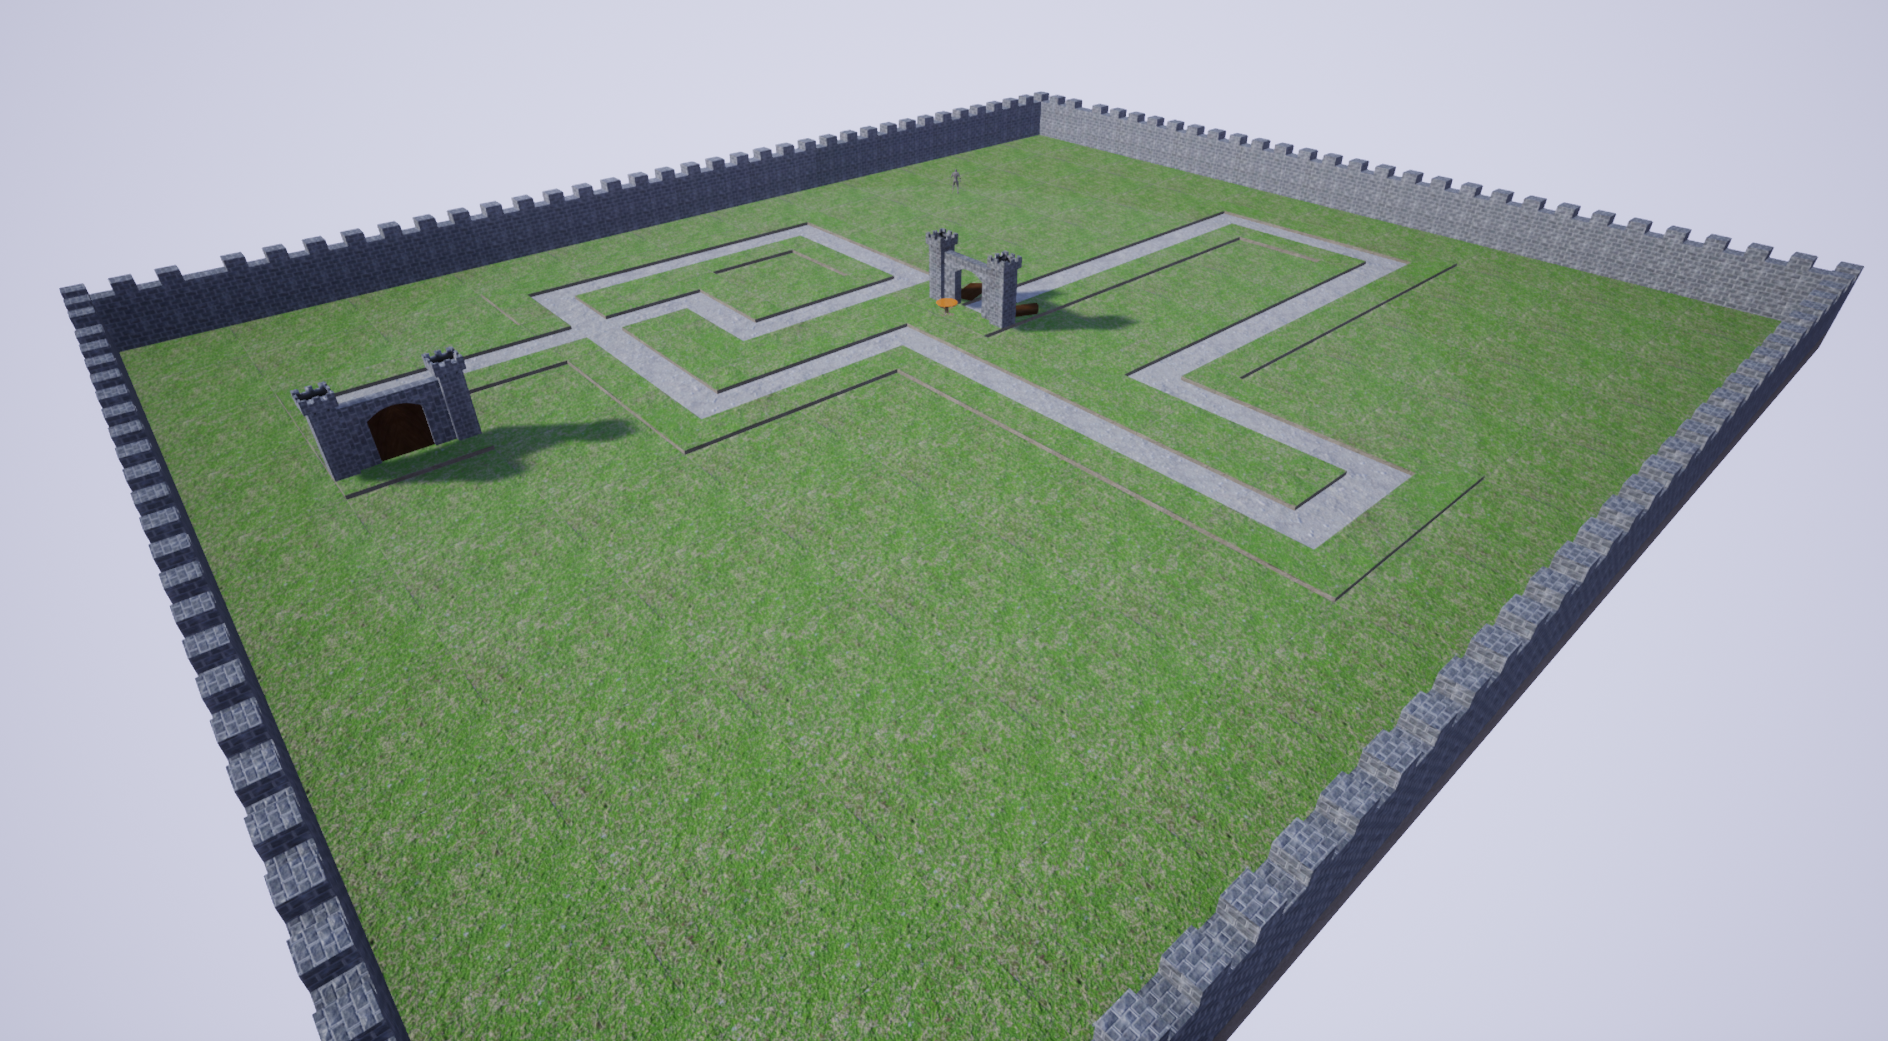
Once the level's path is generated, the Builder finishes the level by placing surrounding terrain to form a rectangular plane around the path. To do this, the Builder needs to know the dimensions of the level as well as the coordinates for each of its corners. However, depending on how straight or bendy the level that generates is, as well as the direction the path is built in, these factors can vary greatly.
To obtain this data, the Builder tests the coordinates of each tile it places; If its x and/or y coordinate is the lowest or highest of any other tile placed, the respective coordinate is recorded by the Builder. By the time all of the tiles are placed, the Builder has a pair of Vecter2's representing the smallest and largest x/y coordinate any tile has, or in simpler terms, the coordinates of the two opposite corners of the level. This is what we use to build our plane.
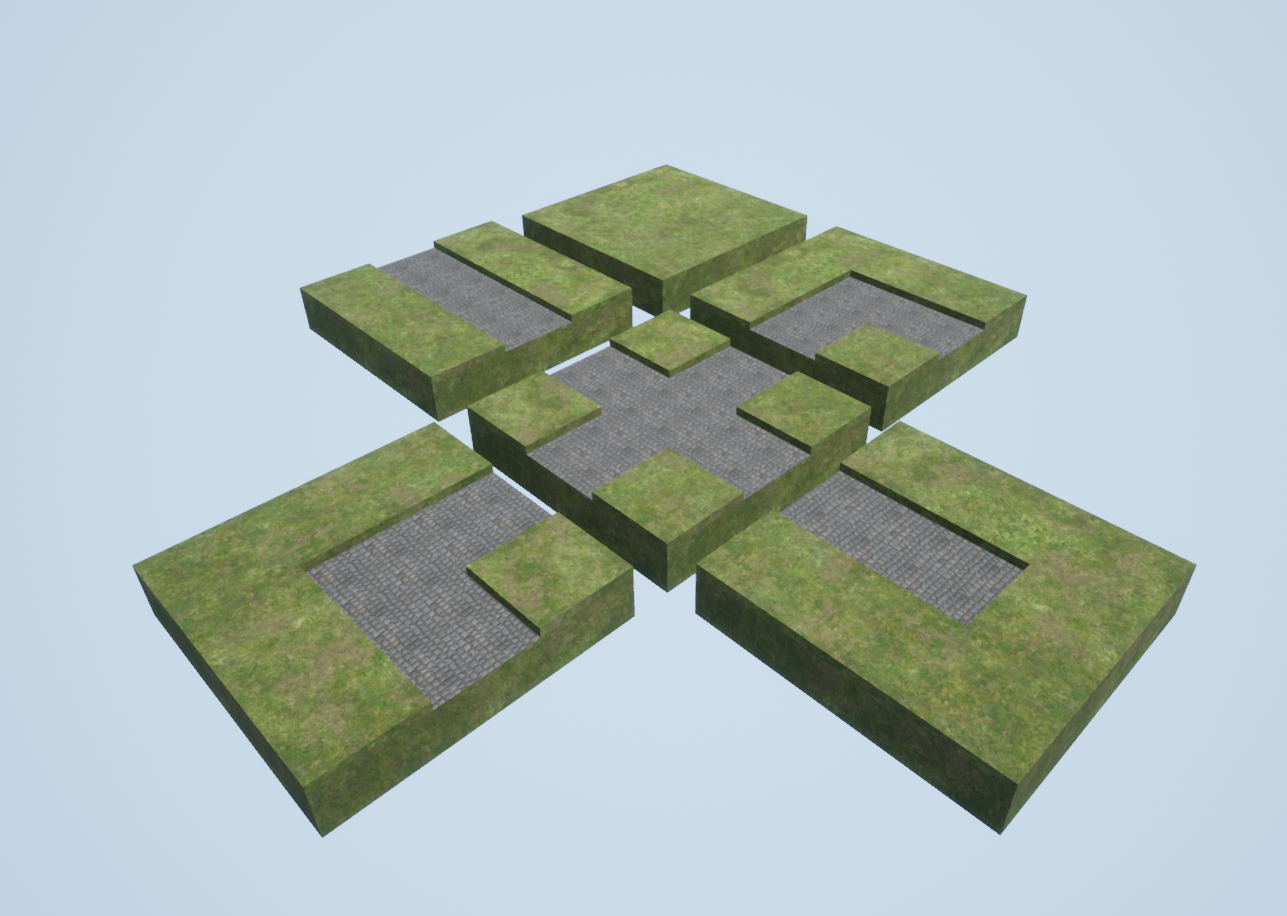
From here, generating the ground is as simple as using a pair of loops to place blank tiles starting from the min corner and ending at the max corner. Raycasts are used to prevent a blank tile from being placed atop a path tile. With just a bit of extra work, we can have the Builder check if a tile is along the edge of the level and place a wall if such is the case. I've even parameterized a "border" for the level, allowing additional padding between the level's wall and path.
Level Decorations
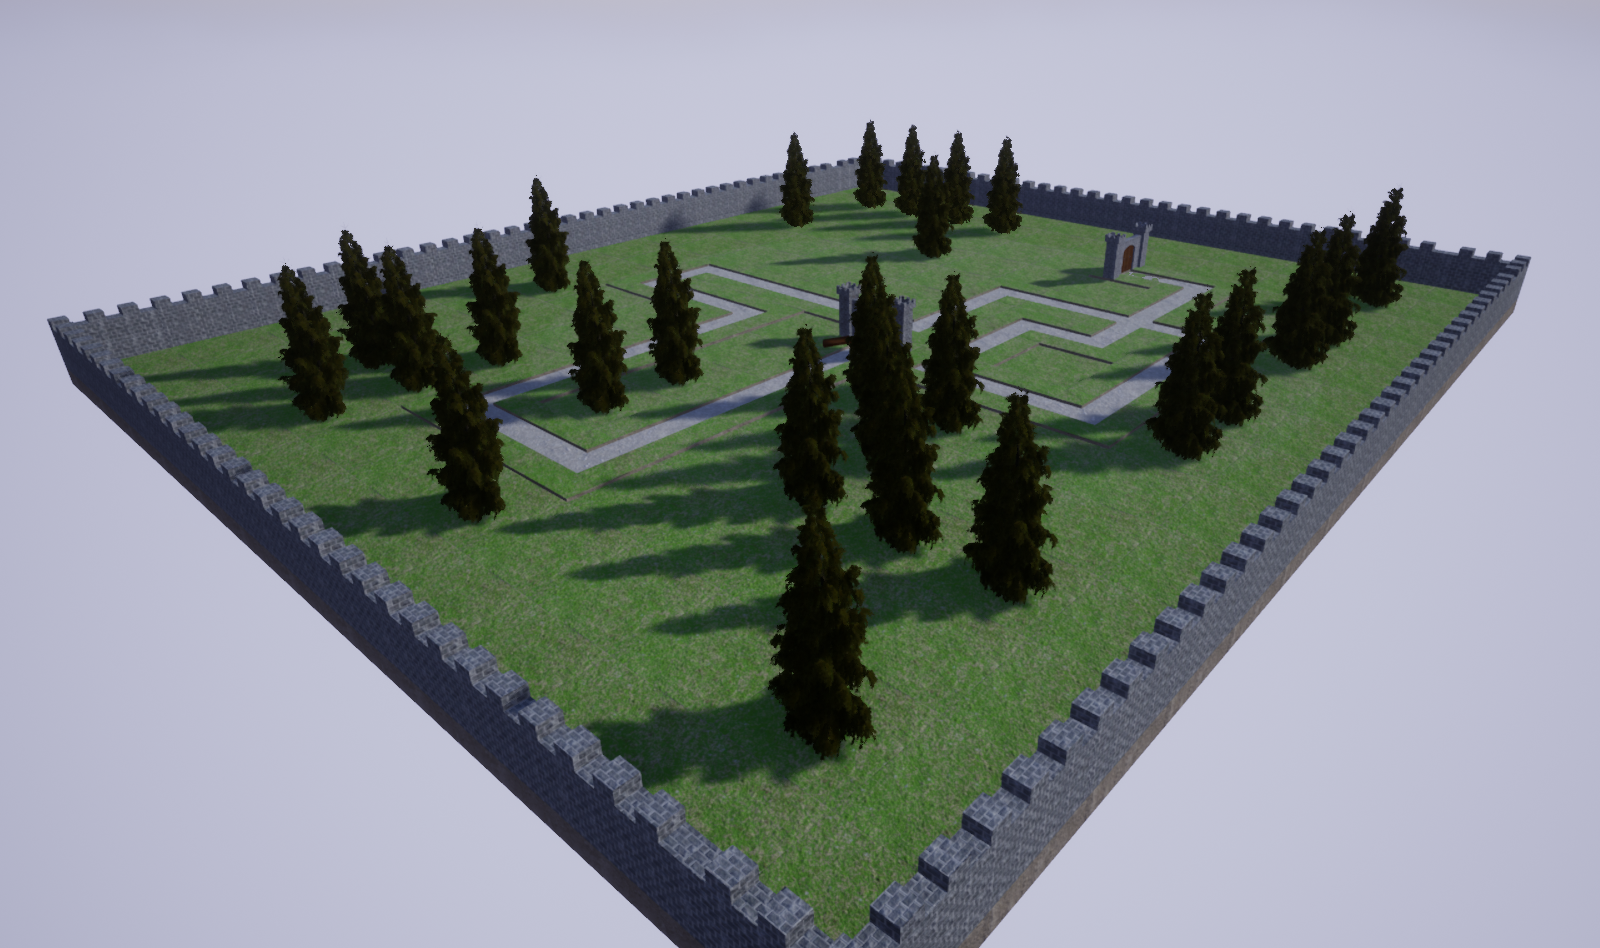
Whenever a blank tile that does not have a wall is placed, it has a chance to have a decoration spawned on it. This chance is equal to a Decoration Chance parameter set pre-generation. Though decorations are relatively minimalistic, I employ a simple trick to get them looking nice. Whenever a decoration is placed, its location, size, and rotation are randomized. This gives maps a more "natural" look to them. The difference when using this technique is shown below.
Tower Range Indicators
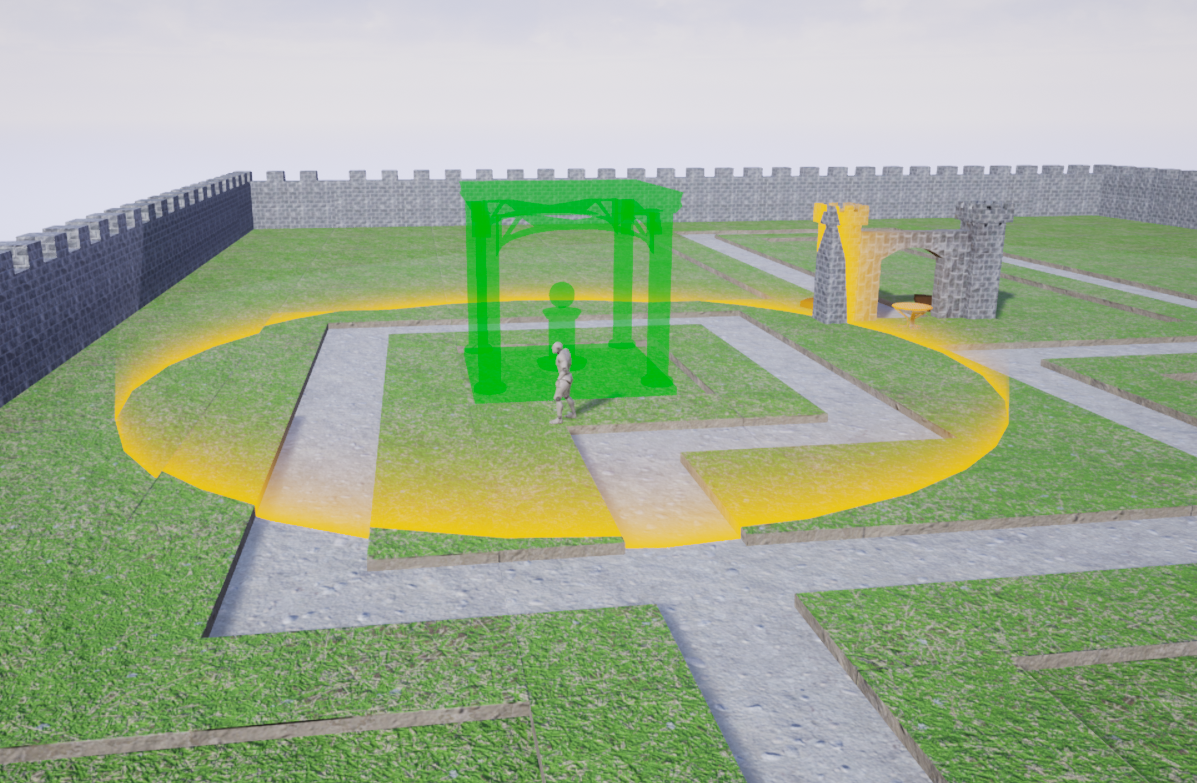
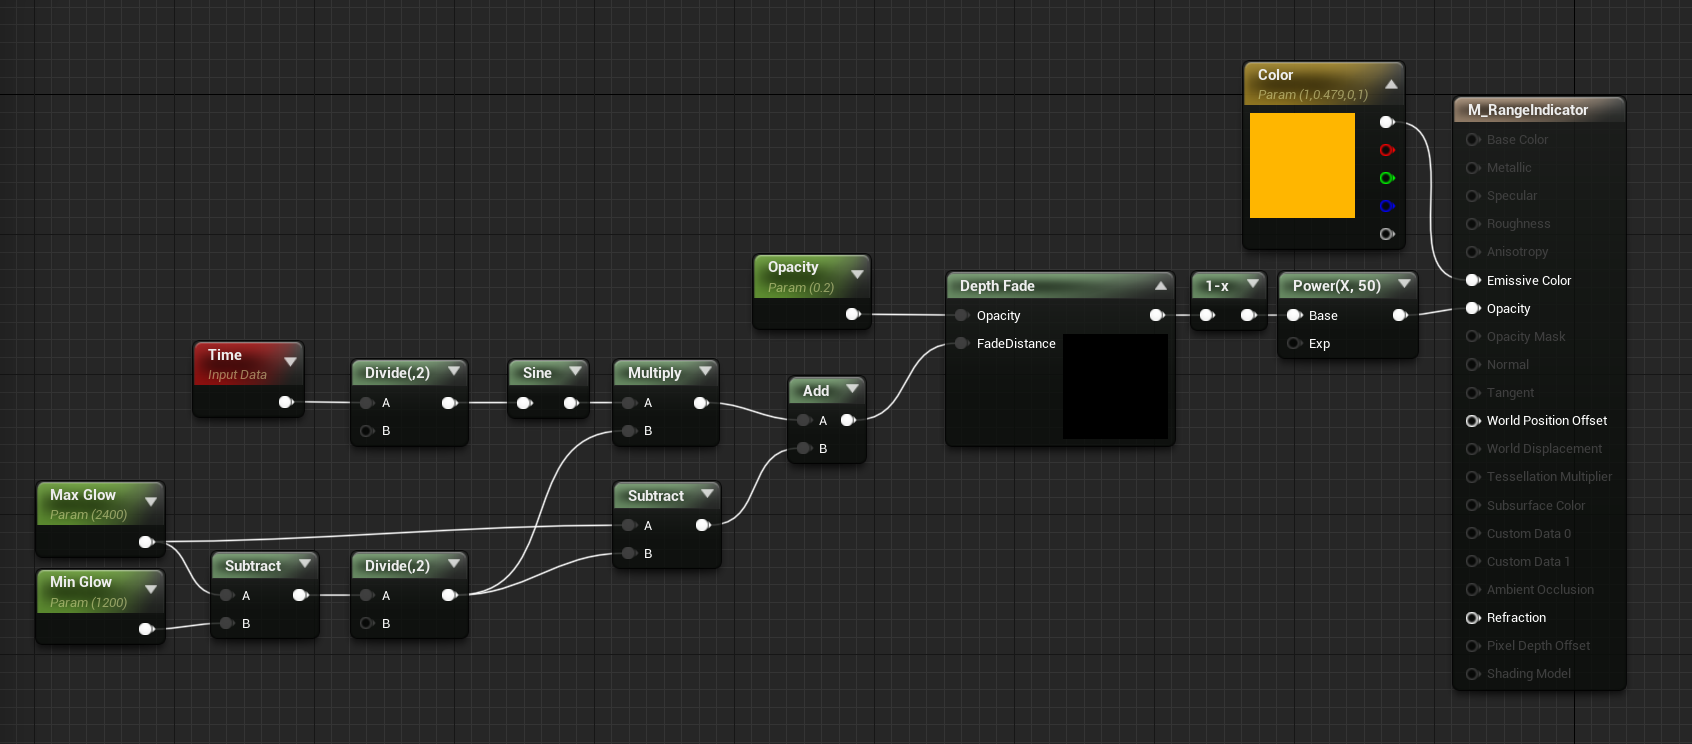
When a tower is being placed or upgraded, the player is given a preview of the tower's range. You may notice that the preview adapts to the edge of whatever it collides with. To get this effect, I use the Depth of Field (henceforth "DoF") material node. The DoF node gives an opacity map that becomes transparent at points around where something is touching our mesh. This effect can be inverted with a "x-1" node to make a material that is only visible around where it is intersecting something. I can use the Fade Distance input of the DoF node to control the size of the area affected by touching objects; I've connected a sine wave to this input to give the material a neat pulsating effect. Finally, I had some trouble getting the overall opacity where I wanted it to be, so I ran the DoF's output through a Power node to increase its overall intensity.